How to use aapanel: Installation, Configuration, and Security
Are you tired of wrestling with complex and confusing web server control panels? If so, a breath of fresh air is on the horizon. Let’s introduce you to aaPanel, a user-friendly alternative to traditional web server control panels. Imagine having a Swiss Army knife for your web server management needs; that’s what aaPanel offers with its feature-rich platform and over 100 server management functions.
In this comprehensive guide, we’ll walk you through the process of installing, configuring, and securing your web server with aaPanel. Whether you’re a seasoned developer or a beginner just dipping your toes into the world of web server management, this guide is designed to help you get the most out of aaPanel. So, let’s dive in and explore the many benefits and features of aaPanel, and how to use it effectively for your web server management needs.
TL;DR: What is aaPanel?
aaPanel is a user-friendly, feature-rich web server control panel. It simplifies web server management tasks with its intuitive interface and over 100 server management functions. It’s like a Swiss Army knife for your web server management, offering a simpler alternative to traditional, complex web server control panels. For more advanced methods, background, tips and tricks, read the rest of the article.
Table of Contents
Unpacking aaPanel
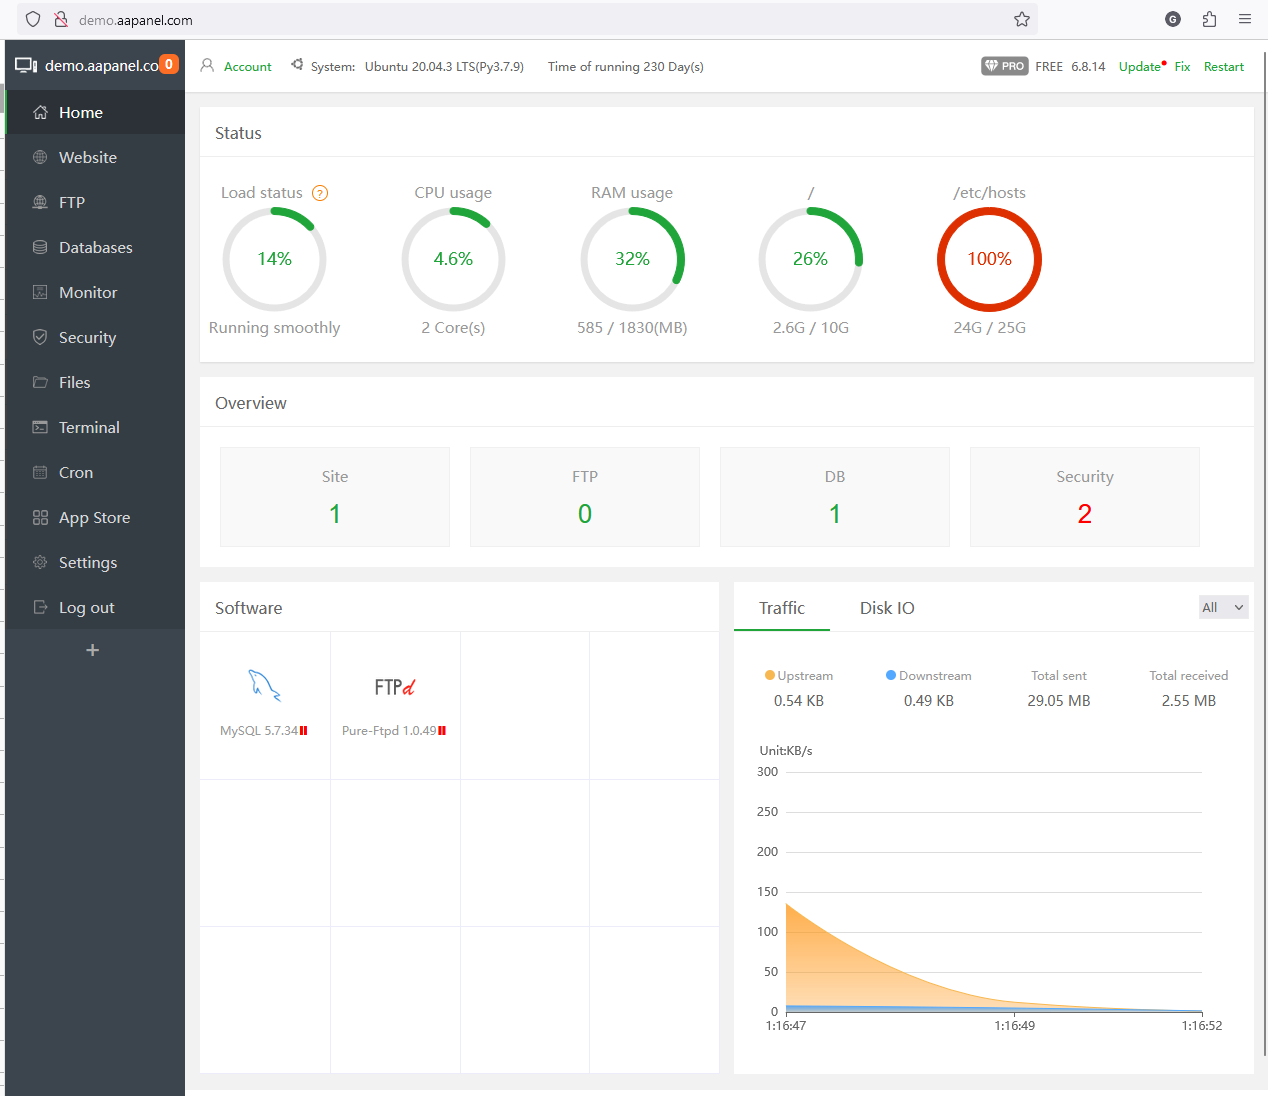
Ever wondered what sets aaPanel apart in the realm of web server control panels? As a free, open-source web hosting control panel, aaPanel is designed for simplicity and user-friendliness. It stands out in a market often dominated by complex and confusing control panels, offering an intuitive and easy-to-navigate platform, even for beginners.
If you want to see what aapanel looks like without having to install it first, aapanel have a live demo you can check out.
Key Features of aaPanel
One of the defining features of aaPanel is its robust toolkit. It comes packed with a plethora of features that make managing your web server a breeze. From an editor, uploader, file manager, to a backup system, aaPanel has got you covered. Plus, it saves you the hassle of manual configuration with its preconfigured Nginx rules.
| Feature | Description |
|---|---|
| Editor | Edit your server files directly from the panel |
| Uploader | Upload files to your server directly from the panel |
| File Manager | Manage your server files with an intuitive interface |
| Backup System | Schedule and manage backups of your server data |
| Preconfigured Nginx rules | Save time with preconfigured rules for Nginx |
The User-Friendly GUI of aaPanel
The user-friendly Graphical User Interface (GUI) of aaPanel is one of its major attractions. Designed with simplicity and ease-of-use in mind, it turns web server management from a chore into a pleasure. With aaPanel, managing your web server doesn’t require you to be a tech whiz; everything you need is just a click away.
Keeping Up with the Latest Version of aaPanel
The latest version of aaPanel boasts over 100 server management functions. It’s constantly updated with new and improved features to keep up with the changing needs of web server management. With each update, aaPanel becomes more powerful, more efficient, and more user-friendly.
aaPanel Advantage for Beginners
If you’re a beginner or transitioning from a shared hosting plan, aaPanel is a godsend. It’s designed to make your web server management journey as smooth as possible. With aaPanel, creating and managing your content becomes your primary focus, leaving the technicalities of web server management to your virtual personal assistant – aaPanel.
aaPanel Installation
Before we dive into the installation process, let’s ensure you have the necessary prerequisites. You need a VPS or dedicated server running a recent version of CentOS , Debian, or Ubuntu. Additionally, root access to your server is a must.
| Prerequisite | Description |
|---|---|
| VPS or Dedicated Server | A virtual or dedicated server to install aaPanel |
| CentOS 7 or Ubuntu 16.04/18.04 | The server should be running on one of these operating systems |
| Root Access | You need root access to your server for installation | Once these prerequisites are covered, you’re all set to start installing aaPanel. |
Kickstarting the Installation with aaPanel Script
The first step in aaPanel installation involves running the installation script. In Ubuntu and Debian This can be achieved with the following command:
wget -O install.sh http://www.aapanel.com/script/install-en.sh && sudo  bash install.sh

--2019-02-14 07:20:32--  http://www.aapanel.com/script/install-en.sh
Resolving www.aapanel.com (www.aapanel.com)... 122.114.63.5
Connecting to www.aapanel.com (www.aapanel.com)|122.114.63.5|:80... connected.
HTTP request sent, awaiting response... 200 OK
Length: 16614 (16K) [application/octet-stream]
Saving to: ‘install.sh’

install.sh          100%[===================>]  16.22K  --.-KB/s    in 0.1s

2019-02-14 07:20:32 (113 KB/s) - ‘install.sh’ saved [16614/16614]
This command downloads and runs the aaPanel installation script. Remember to run it as the root user to avoid any permission issues.
There is an alternate installation method available for CentOS installations:
yum install -y wget && wget -O install.sh http://www.aapanel.com/script/install_6.0_en.sh && bash install.sh aapanel
Additional installation details and various service settings and options are documented on the aapanel download website.
Navigating Through the Installation Process
During the installation process, you’ll be prompted to set a username and password for your aaPanel login. Choose a strong password and keep these details secure for future reference. Post-installation, you can access your aaPanel control panel by using your server’s IP address followed by the port 8888. For example, if your server’s IP address is 123.45.67.89, you would access your aaPanel control panel by navigating to http://123.45.67.89:8888 on your web browser.
# Example
Username: admin
Password: your_strong_password
URL: http://123.45.67.89:8888
Staying Updated with aaPanel
To maximize the benefits of aaPanel, it’s vital to keep it updated with the latest features and security patches. Regularly check the aaPanel website or subscribe to their newsletter to stay informed about new updates. Remember, an updated application is not just about new features – it’s also about enhanced security and performance.
aapanel app store
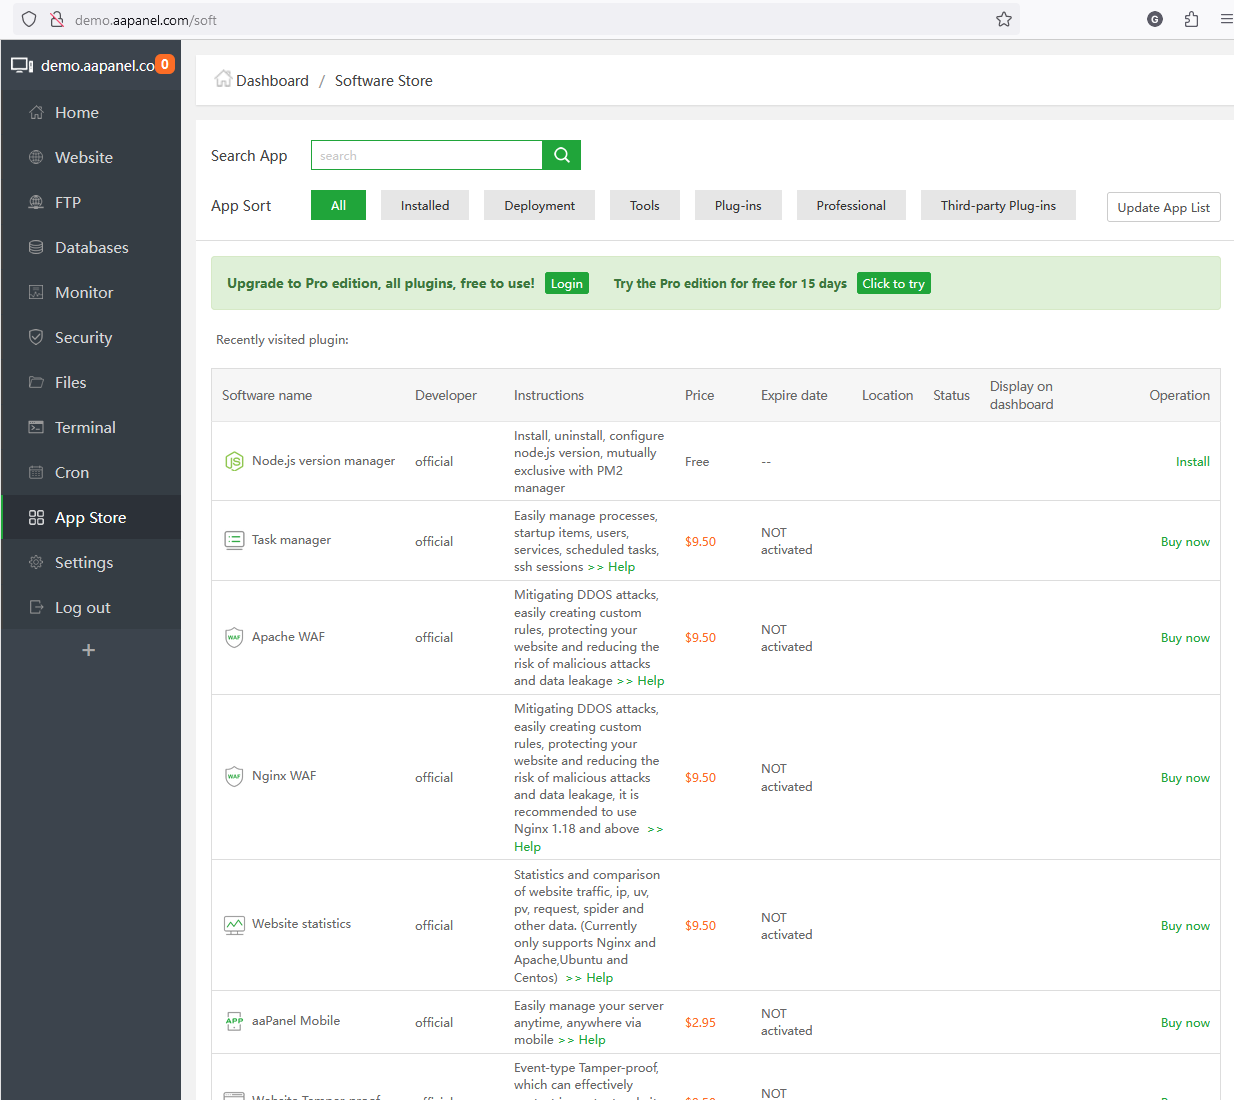
Installing the necessary web server software, databases, PHP extensions and apps is a cinch with aaPanel. The control panel features an auto-installer that streamlines the process. Here’s how to leverage it:
- Head to the ‘App Store’ section in your aaPanel dashboard.
Browse through the available server software, PHP extensions and apps. Click ‘Install’ on the ones you need.
Wait for the installation to complete. The installed extensions and apps will now be available for use on your server.
Managing Multiple PHP Versions
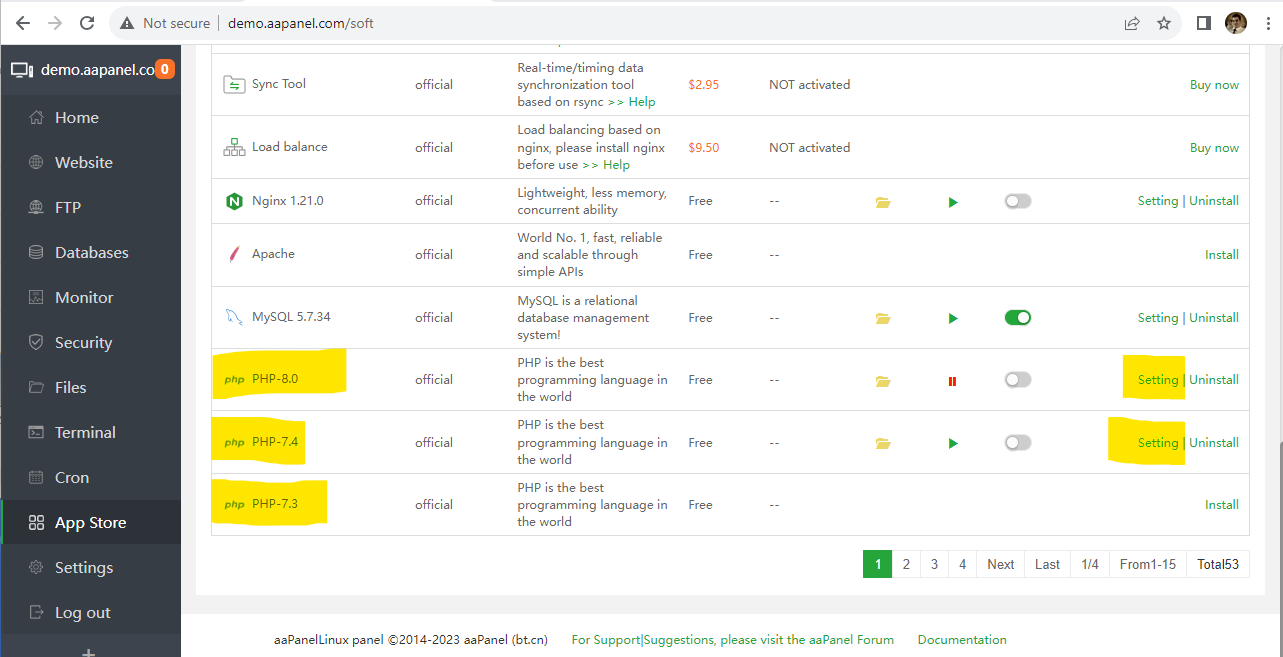
Different projects may necessitate different PHP versions. With aaPanel, this is easy to handle. The control panel allows you to install multiple PHP versions and switch between them as needed.
To do this, go to the app store, and scroll down until you see available and installed PHP versions. You can configure them from here.
aaPanel Server Resource Management
One of the standout features of aaPanel is its ability to manage server resources in real time. This feature gives you a live snapshot of your server’s performance, enabling you to monitor and manage your server resources effectively.
Leveraging the Real-Time Resource Management Feature
To use this feature, follow these steps:
- Log into your aaPanel dashboard.
Navigate to the ‘Monitor’ section. Here, you’ll find a real-time graph displaying your server’s CPU usage, memory usage, and network traffic.
Hover over the graph to view specific data points. This can help you identify any spikes in resource usage and take necessary actions.
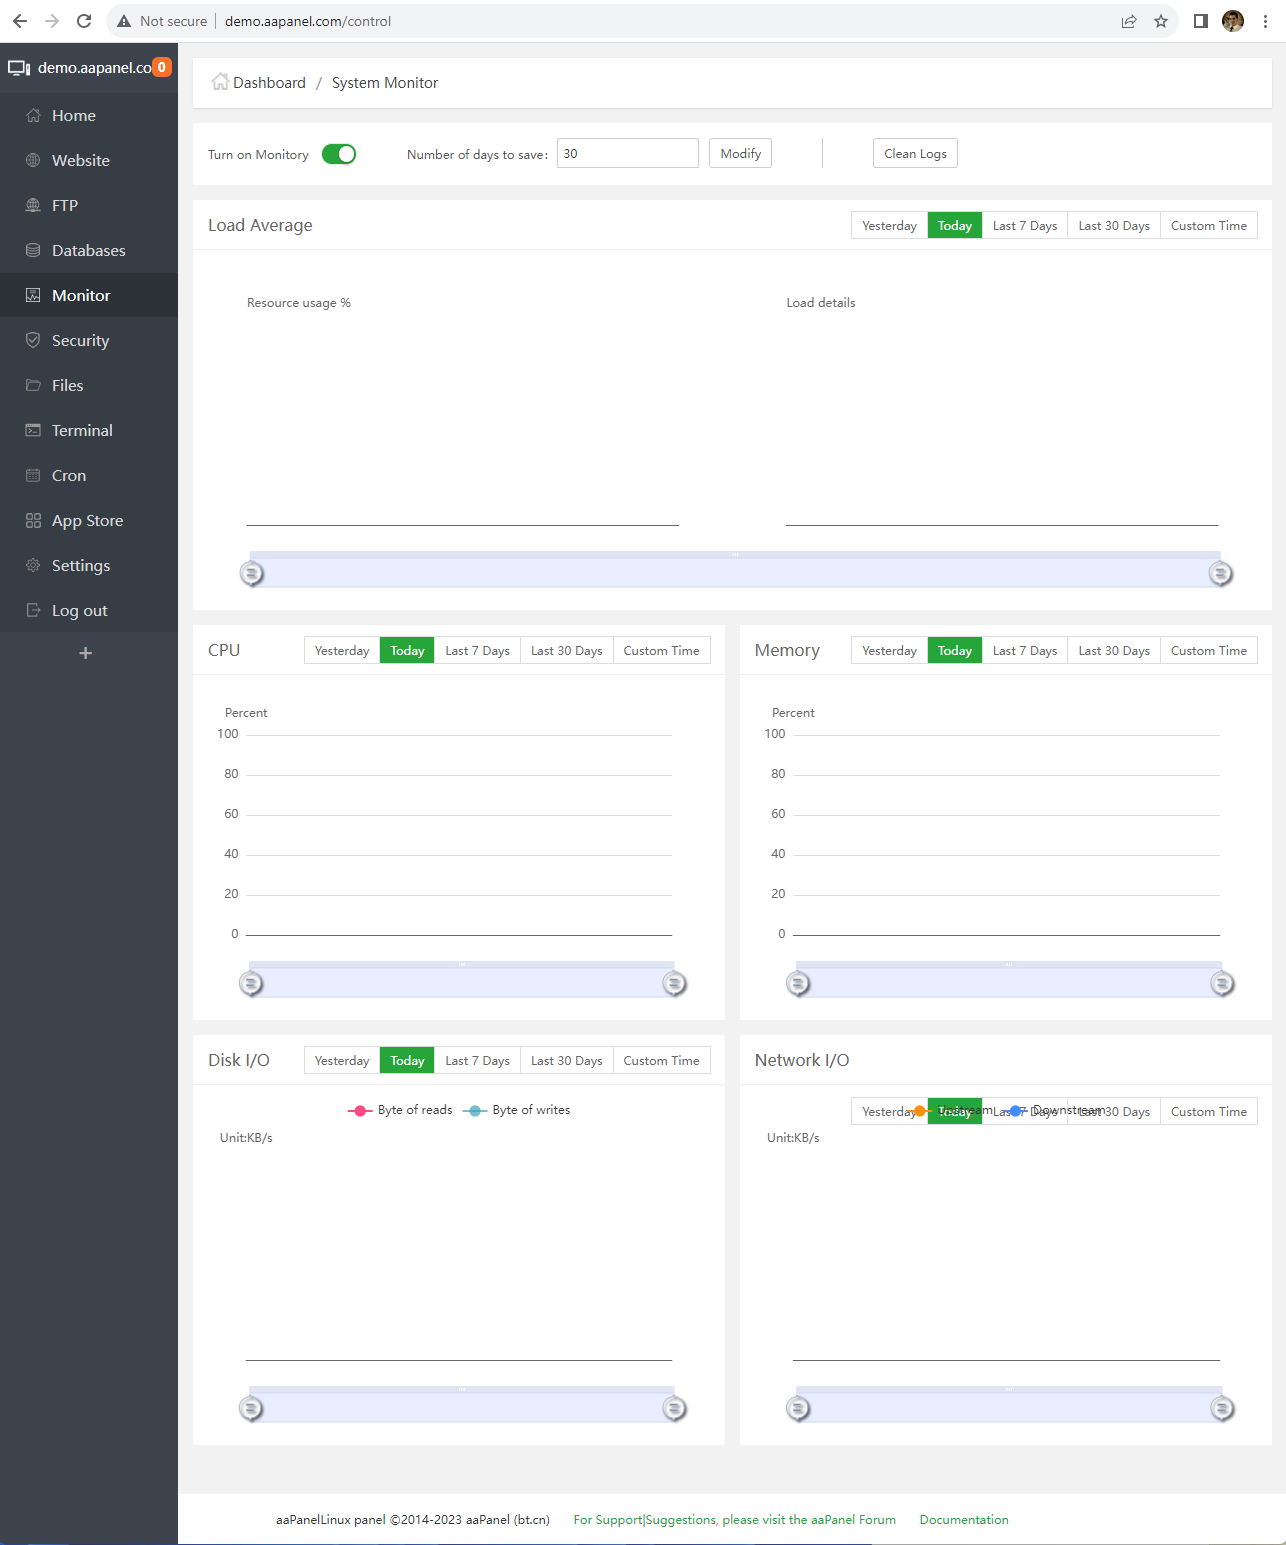
The real-time resource management feature is a powerful tool for server administrators. It allows you to keep a close eye on your server’s performance and make informed decisions about resource allocation.
This can be particularly useful in scenarios where your server is experiencing heavy traffic. By monitoring your server resources in real time, you can identify potential bottlenecks and take immediate action to prevent server slowdowns or crashes.
aaPanel Server Security
Server security is a matter of utmost importance. It serves as the backbone of your online presence, safeguarding your data and your users from malicious attacks.
One of the key tools in bolstering server security is Fail2ban, an intrusion prevention software that shields your server from brute-force attacks. It does this by vigilantly monitoring your server for repeated failed login attempts and banning the IP addresses associated with these attempts.
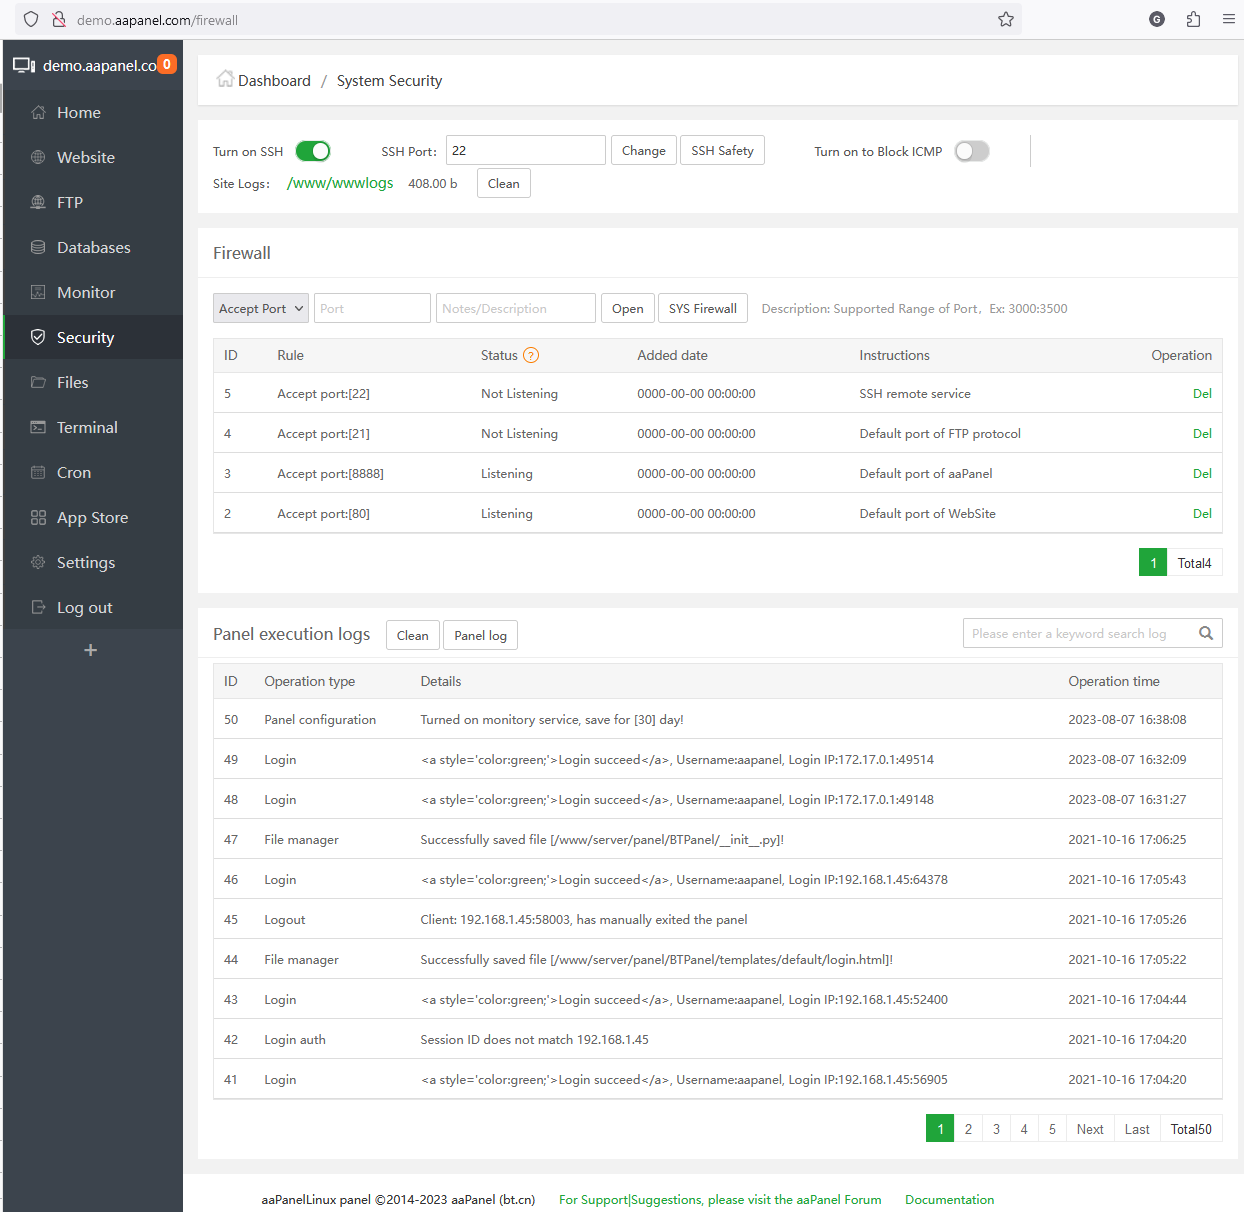
Configuring a New Port for aaPanel
For enhanced security, it’s advisable to configure a new port for your aaPanel. This can be executed from the ‘Settings’ section in your aaPanel dashboard. Once there, navigate to ‘Panel Settings’ and modify the ‘Panel Port’ to a new value.
# Example
Login to aaPanel -> Go to 'Settings' -> Navigate to 'Panel Settings' -> Modify 'Panel Port' to a new value
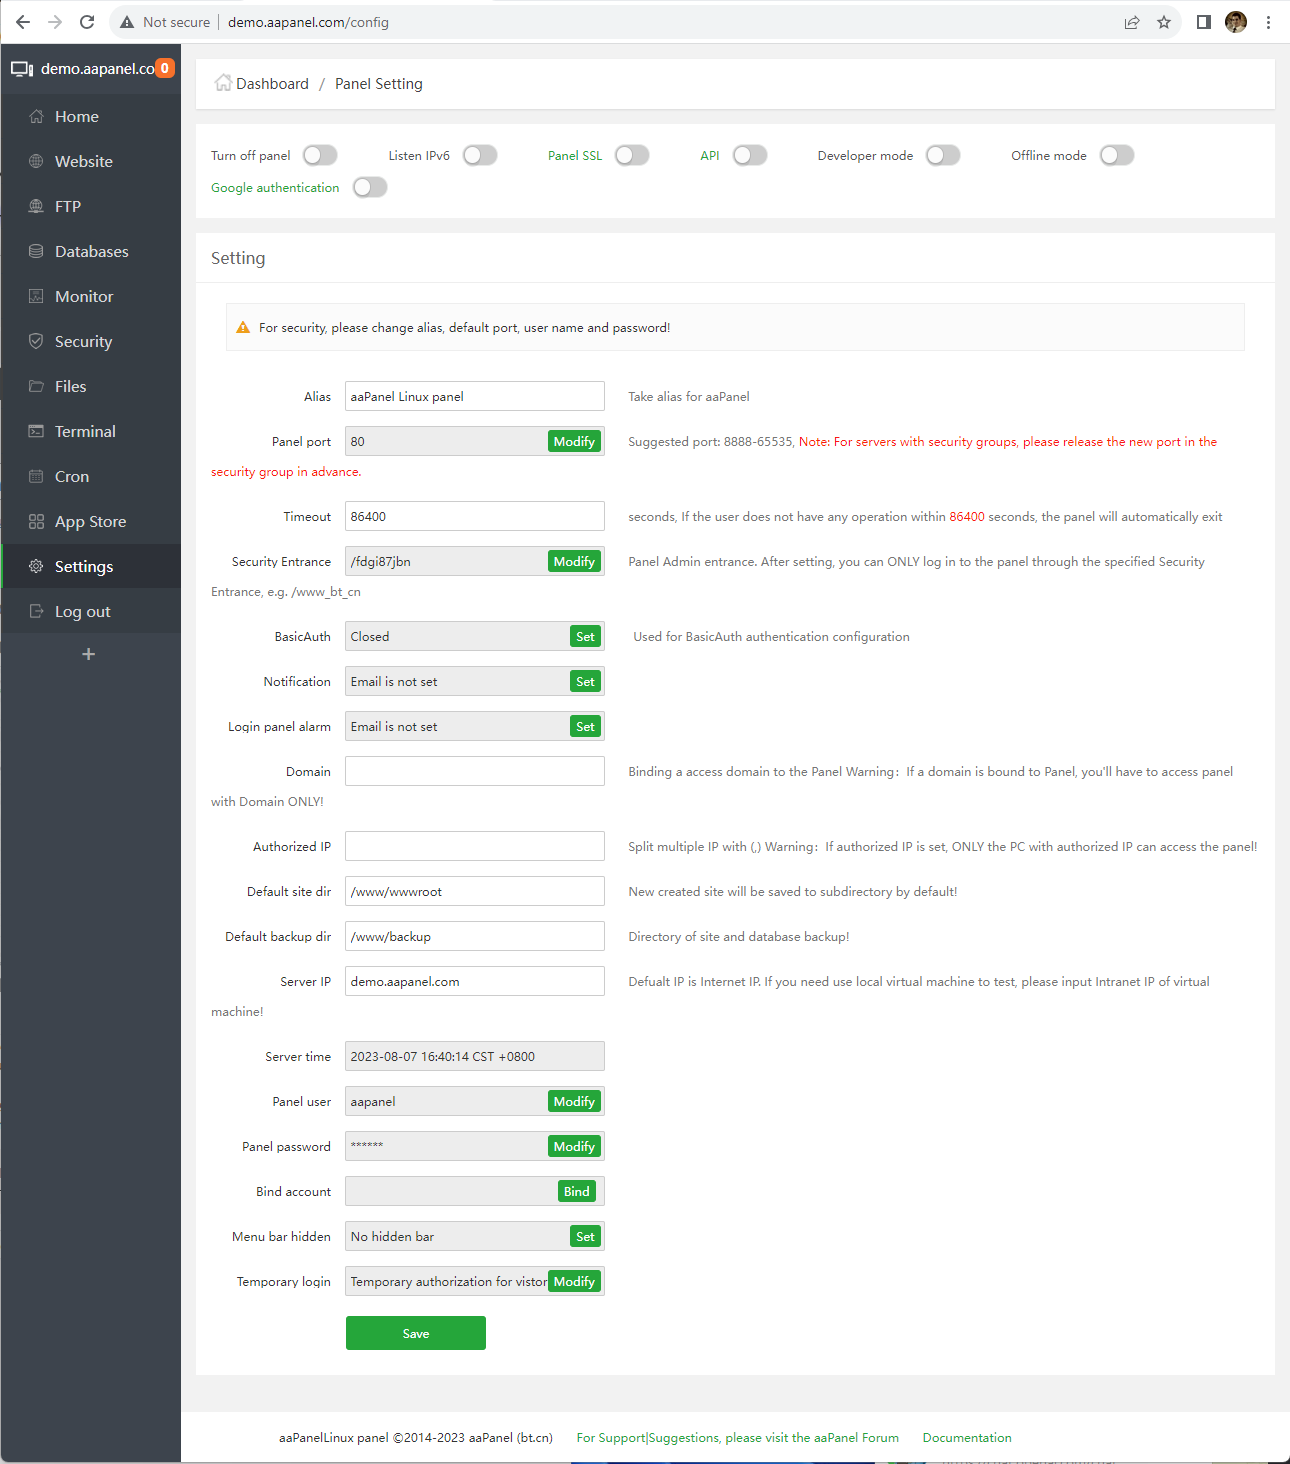
It’s best practice to select a port number above 1024 and below 65535 to avoid conflicts with other services.
Tweaking aaPanel Settings for Greater Security
Changing the port is just one of the many aaPanel settings you can tweak for added security. Other settings include the login URL, username, and password. Altering these settings makes it more challenging for unauthorized users to gain access to your aaPanel.
# Example
Login to aaPanel -> Go to 'Settings' -> Change login URL, username, and password
Bolstering aaPanel Connection Security with SSL
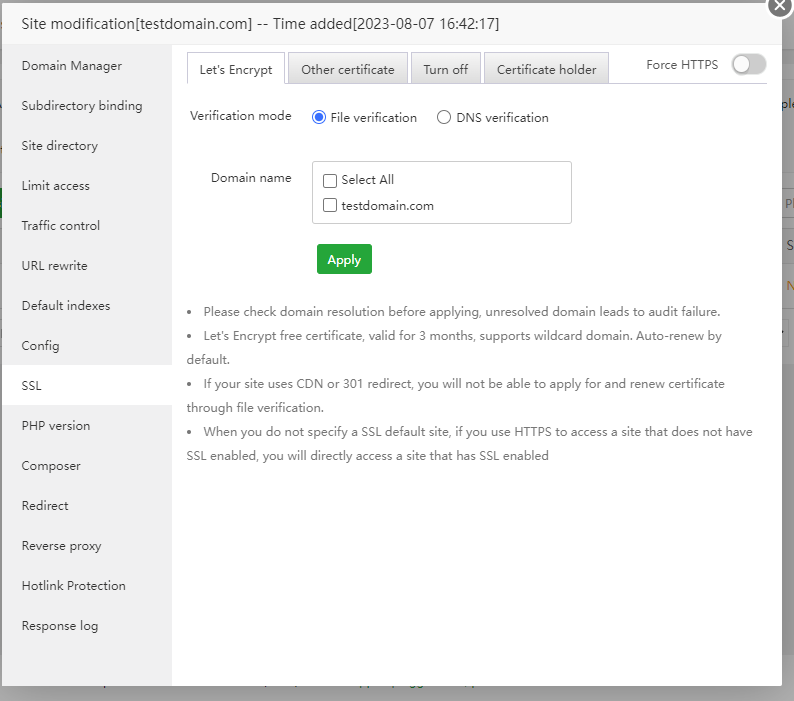
To further boost the security of your aaPanel, you can secure the connection to it using SSL. This encrypts the data transmitted between your browser and aaPanel, thwarting any attempts by malicious actors to intercept it.
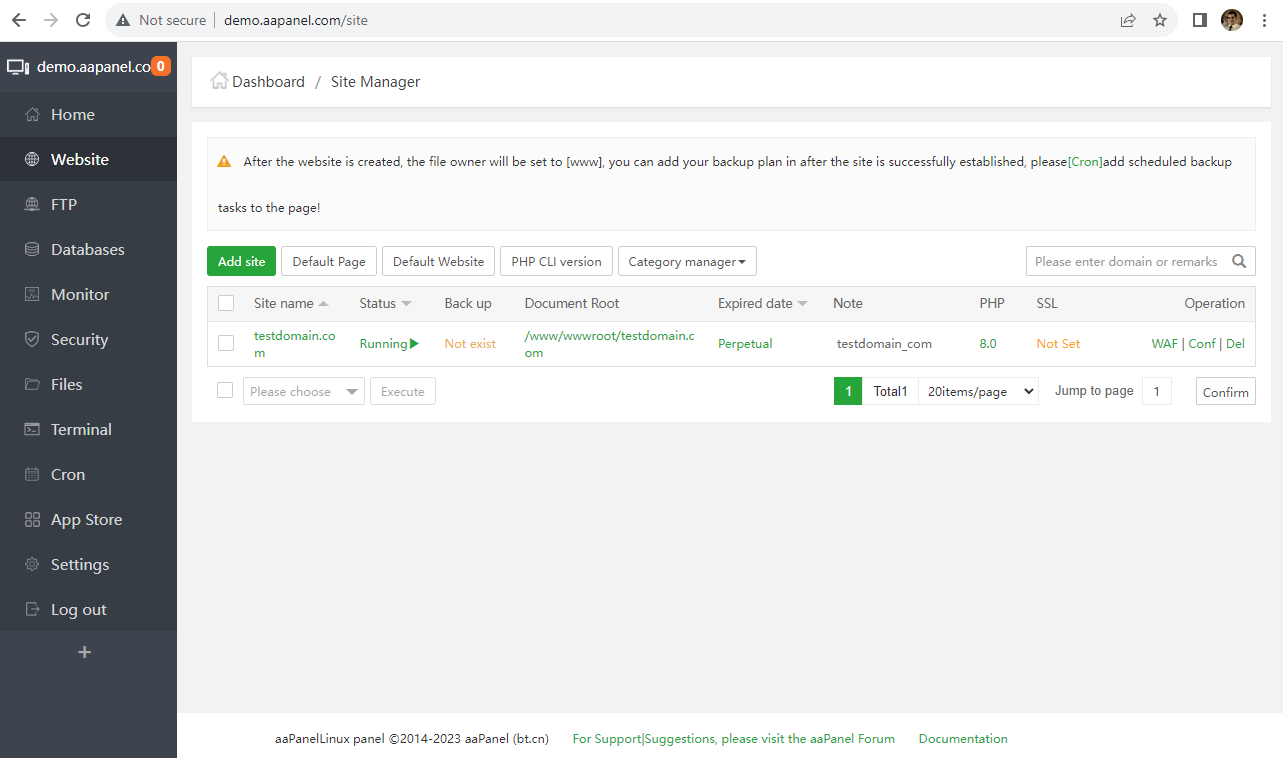
If you don’t already have one, you can buy SSL Certificate to achieve this added security. To install your certificate, navigate to the ‘SSL’ section in your aaPanel dashboard and follow the on-screen instructions to set up SSL.
# Example
Login to aaPanel -> Go to 'website' -> click 'conf', then click 'ssl'.
Summary
The world of web server management need not be intimidating. With aaPanel, you can efficiently manage your server, regardless of your technical expertise. This control panel, with its intuitive GUI, comprehensive toolkit, and real-time resource management feature, simplifies web server management.
In this guide, we’ve taken a deep dive into the installation and configuration of aaPanel. We’ve also explored real-time server resource management SSL configuration.
The significance of aaPanel in web server management is immense. It’s a potent and flexible tool that meets the needs of both novices and seasoned developers. With aaPanel, you can concentrate on your content while it handles the technicalities of web server management. So, why not take aaPanel for a spin and witness the transformative impact it can have on your web server management tasks?


